|
|
TITLE |
||
|
|
|||
|
DOCUMENT ID |
Creating, Approving, and Issuing a Permit to Work in ePAS |
||
|
|
|||
Identification of work hazards and understanding the risks is an essential part of Jefferson Lab’s work process. The purpose of this document is for workers to; understand the concept of a Permit to Work, understand how a Permit to Work moves through various states, understand how a Permit to Work is created from the Permit Request, be able to create a new Permit to Work, be able to plan all facets of a Permit to Work by addition and/or review of key information, be able to review, plan and approve a Permit to Work, and be able to visualize any cross referencing between Plant Items.
This training manual covers the end to end workflows of the Permit to Work and the tasks associated with a Permit to Work (PTW). The Permit to Work captures all the information associated with an authorization to perform work. It is created to carry out planned and unplanned works whilst ensuring the required levels of staff and safety processes are met. This Training Manual covers the following tasks associated with a Permit to Work and associated permits:
· Creating a Permit to Work
· Amending a Permit Request
· Deleting a Permit to Work
· Approving a Permit to Work
· Rejecting a Permit to Work
· Issuing a Permit to Work
· Suspending a Permit to Work
· Modifying a Permit to Work
· Transferring a Permit to Work
· Surrendering a Permit to Work
· Remote Approval for a Permit to Work
Note: Management
authority may be delegated to a task-qualified TJNAF employee at the discretion
of the responsible manager.
3.1
Everyone at Jefferson Lab
·
Identify
the work in accordance with standard procedures – Utilize task
lists, as appropriate (ATLis
or clone), to both plan and communicate the planned work. [Note: ALL electrical Class II and
above work will require an ePAS PTW with an Isolation Certificate (IC) or
Complex Isolation Certificate (CIC) that incorporates the relevant information
from the Operational Safety Procedure (OSP) or Temporary OSPs (TOSP).
Attachment of the OSP/TOSP is optional in the ePAS system documentation
section.”
·
Perform
preliminary planning for assigned tasks
·
Review
lessons learned and promote continuous improvement.
·
Hold yourself and others
accountable for staying within the guidelines of policies and procedures.
·
Ensure hazards
are analyzed prior to performing work.
·
Ensure
all documentation and approvals are obtained prior to
performing work.
·
Ensure you
have adequate
and appropriate training in accordance with Jefferson Lab’s
requirements. Check for updates to training periodically.
·
Read
and abide by associated, approved Work Control Document (WCD). Ensure the WCD is up-to-date and
will not expire during the work (i.e. OSPs are 3 years, LOTO are for 12 months,
TOSPs are for less than 90 days, permits to work have varying expirations).
·
While
working, re-evaluate the scope and Task Hazard Analysis (THA) associated with a particular WCD if
appropriate.
·
Solicit
and provide feedback for future reference.
·
Help
document lessons learned according to your group, department, division and/or
lab procedures.
3.2
Work
Control Document
(WCD) Author/Creator
(ePAS)
· Writes the correct TOSP, OSP, THA, LOTO, and/or ePAS permit to work/certificate
· If the author is the lead worker, ensure all affected workers read, understand and sign associated documents.
Note: The Author/Creator may NOT have the
proper training or requirements necessary to perform the work. The
Author/Creator may NOT be the Lead Worker or any worker if the person has not
completed required lab and equipment specific training. In ePAS, the Creator
CANNOT be the Approver for a Permit to Work (PTW).
· Define the Scope of Work.
· Analyze the Identified Hazards.
· Develop the Procedure to mitigate the hazard.
· Document the approved permit and certificate.
· Briefs the Recipient-in-Charge (RIC) on the Permit to Work (PTW).
3.3
Department
Heads &/or Divisional Safety Officers (DSO)
·
Responsible
for the oversight of the tasks being performed and the implementation of Work
Control Documents.
·
Shall
be accountable for tasks staying within the guidelines of policies and
procedures.
3.4
Supervisors, Technical
Representatives (TR),
Sponsors
·
Make sure proper documentation, Work
Control documents, and competencies are obtained and current by all Work Party
Members and the RIC for specific tasks.
·
Shall
be accountable for staying within the guidelines of policies and
procedures.
·
Ensure that the RIC performs a Pre-job
Safety Brief.
·
Ensure that the RIC has the Work Party
Members sign in and out of the Signature Sheet and turns it in at the end of
the task when the PTW is Surrendered.
·
Oversee periodic audits of the LOTO
procedures to ensure that they are current with lab policies and requirements.
If audit results find that the procedures are not current, then the work being
performed shall be stopped with a STOP WORK in place until the procedure is
updated.
3.5
Recipient-in-Charge (RIC)- (staff-JLab
Employee ONLY who is responsible for ePAS permit/certificate and OSP
implementation)
· The RIC IS the Lead Worker on the job being performed.
· Shall be accountable for staying within the guidelines of policies and procedures.
· Insure that the individuals are assigned specific tasks, have the appropriate training and competencies, and make sure that the Work Party Members assigned to the PTW sign in and out on the Signature Page.
· Implement the approved permit/certificate.
o Post the ePAS permit/certificate in-or-around the affected area.
o Ensure affected personnel are aware of the procedure.
o Verify the effectiveness of the procedure by job walk-throughs and procedure review.
·
Review
and update OSPs/LOTO-OSPs associated with the PTW prior to expiration and
whenever there is a change that affects the work activity (e.g., work group
reorganization or equipment upgrade). All LOTO-OSPs are subject to an annual
inspection.
·
Surrender
PTW upon completion of work.
3.6
Lead Worker (OSP)
·
Performs
pre-job safety briefing.
·
Work
tasks within controls.
·
Shall be accountable for staying within the guideline of policy
and procedures.
·
Ensure
all affected workers read, understand and sign associated documents.
·
MUST be
a lab STAFF EMPLOYEE.
·
Can
have a “Co-Lead Worker” who can be staff or a user that is fully trained and
qualified in lab procedures and equipment.
·
Work within the tasks and controls.
·
Shall hold each other accountable for
staying within the guideline of policy and procedures.
·
Must read and understand the Work
Control Documents.
·
Must have the required training and
competencies associated with the job.
·
Must attend the Pre-job Safety Brief or
be briefed individually by the RIC.
·
Sign in and out of the Signature sheet
associated with the PTW (electronically or manually).
3.8
Environment,
Safety, and Health (ES&H) Division
·
Assist organizations in providing
guidance with lab safety and training procedures and policies.
·
Assist organizations in implementing
this process.
·
Implement training and competencies.
·
Audit OSPs, Permits, and LOTOs, as
necessary.
·
Interpret and define safety policies
and industry standards.
· ES&H shall enforce policy and procedures, and perform investigations, as necessary.
4.0
Permit to Work Process
The Permit to Work (PTW) is used to authorize personnel to work on equipment. Most work activities are authorized and performed using a PTW.
The permit can have one or more control certificates or forms associated, such as an Isolation Certificate, to provide coverage from energy sources and high-risk work and to implement the necessary controls required to undertake the work. These are described in further detail later in this document.
4.1
Permit
Planning
The permit planning is focused around the association of a permit with one or more control certificates. Controls associated with the certificate do not have to be implemented at the planning stage but must be implemented before the permit can be issued. The PTW Permit Issuer is responsible for undertaking the steps within the planning phase.
Certificates are not authorities to perform work but are specialized precautions and controls, including isolations that are linked to a PTW.
Certificates can assist in the management and mitigation of many of the identified risk issues associated with the work being undertaken.
The Permit Issuer is responsible for preparing permits in their area of work. The Permit Issuer must ensure that nominated certificates are appropriate and provide adequate coverage for the work proposed. They also need to ensure these certificates are planned and implemented as required. The Permit Issuer ensures that the permit contains all the necessary data and other associated information.
Once all requirements have been met and all required certificates have been associated with the permit, the Permit Issuer will move the permit to the Planning Complete state. This indicates that the planning phase is finalized, and the permit is then ready for review and approval.
4.2
Permit
Approval
The permit approval phase revolves around the management of any specialist authorizations required by the type of work specified and the validation that the certificates attached to the permit provide the appropriate level of controls for the planned task. These dynamic approvals are only active when the appropriate work category is selected. Where no work categories with dynamic approvals are selected, the standard workflow process will ensue.
Regardless of whether there are any specialist approvals included in the workflow, the permit must be reviewed and approved by the Permit Issuer to confirm that the permit and the linked certificates are adequate.
Once a permit has been set to Planning Complete, an email notification may be generated and sent to the appropriate role(s) that are required to undertake approvals.
At this stage of the workflow, the permit may be put On Hold by a Permit Issuer via the Amend Permit Request process. This provides the ability to modify the original details and correct the reason for rejection. At the same time the Permit Request is reopened, and changes can be made to the HIRA or other details within the Permit Request. The Permit Request is then re-submitted for approval and the Permit is updated with the new information.
The HIRA on Permit feature significantly reduces the requirement to utilize the Amend Permit Request process. Most changes can be directly applied to the Permit to Work.
Once specialist approvers have reviewed the permit and are satisfied with the details, they will complete their approval process. The Permit then requires approval by the Permit Issuer.
The Permit Issuer will review the certificates to ensure appropriate coverage for the work to be completed. The Permit Issuer approving the permit must be a different person to the person who planned the permit and moved it to the state of Planning Complete.
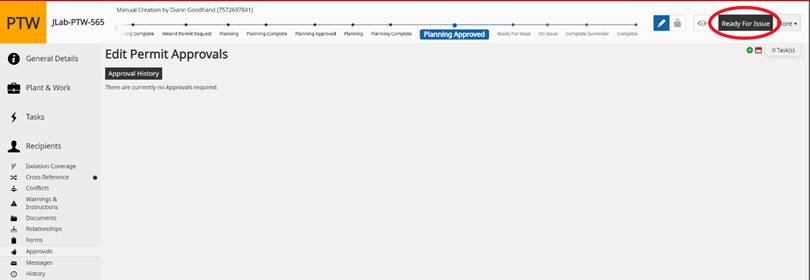
Once all approvals have been completed, the Permit is set to Planning Approved and is ready for the permit issue process to commence.
4.3
Permit
Issue
For a permit to be able to be issued several requirements must be met:
· All mandatory data requirements have been satisfied
· Valid issue and expiry dates exist
· All associated certificates are linked and are in the on-issue state
· A Conflict has not been identified with an existing On Issue Permit
· The Permit Issuer and Recipient both have the required authorizations needed to issue and accept the permit where additional competency requirements have been set.
ePAS will automatically validate that these requirements have been fulfilled. If the validation checks are completed successfully, the permit can be issued. If the validation checks fail, an error message will be displayed advising of the unfulfilled requirements.
A PTW is issued by a Permit Issuer. The permit cannot be issued unless all required certificates are in the On-Issue state. This ensures that all the precautions and controls have been implemented before the work commences.
ePAS enforces this business rule and advises the user that the permit cannot be issued until the attached certificates are in the appropriate state. ePAS will provide a list of certificates and their current state to assist the user in preparing the permit for issue.
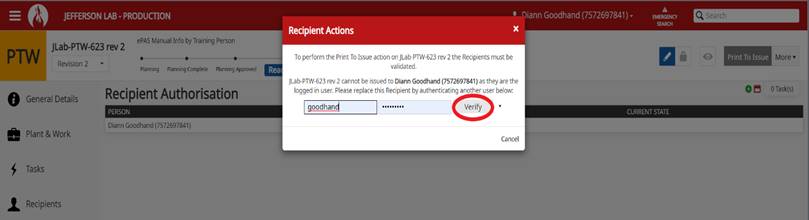
The Permit Recipient and Permit Issuer must both be present to issue the permit. ePAS enforces that a face-to-face issue of the permit is achieved. To process the permit issue the Permit Issuer is required to log on to EPAS.
When the Permit Issuer receives a request from the Permit Recipient that a permit be issued, the Permit Issuer will search for the appropriate permit, select the permit and select the Issue action button.
The Permit Recipient must authenticate as a secondary user to accept the permit.
ePAS will prompt for the required number of Signature Sheet forms to be printed within the permit pack at the same time. Other forms may also be automatically printed at this time if previously defined as a requirement, e.g. a Gas Test form.
ePAS will print the permit pack during the issue process and allows the user to deselect any items that may not need to be printed. The permit pack will include the Permit report, Isolation Coverage report, Signature Sheets and other forms, any related control certificates, and any attached documents.
When the permit pack has been printed and the Permit Recipient briefing is completed the Permit Recipient will proceed with the infield activities prior to the work commencing, i.e. Toolbox Talk, lock on, etc.
4.4
Permit Suspension
PTWs may be suspended when work can no longer progress due to the non-availability of parts or personnel, daily revalidation, operational needs, testing or work conflicts where work needs to be temporarily halted.
Where an Isolation Certificate or other certificate is associated with the PTW, it can be left in place during the suspension process. The certificate(s) can also be suspended, if required.
To suspend the Permit the Permit Recipient is required to return all Signature Sheets for scan off. This verifies that all work party members have signed off the permit. Other forms may also be required to be returned where applicable.
The suspension process requires authentication of both the Permit Recipient and a Permit Issuer at the same time, enforcing the face-to-face meeting. Information on the State of Plant and Lessons Learned can be entered during the suspend process.
The suspended permit can then be held in the Permit Office until required by a Permit Recipient. When the permit is once again required it is re-issued using the standard permit issue process.
4.5
Permit Transfer
4.5.1
No Break in Work
4.5.1.1
In situations where work is being performed
there may be the need to transfer the permit from one Permit Recipient to
another Permit Recipient, i.e. Recipient shift change but same work party. This
transfer method occurs directly between Recipients and the permit remains
on-issue during this changeover. The new Recipient inherits the existing
Signature Sheets and any other forms i.e. Gas Test.
However, it is good practice for the new Recipient to print new Signature Sheet and use this with their briefing with the existing work party i.e. sign off the old Signature Sheet and on to the new Signature Sheet with the new Recipient’s name shown on the new sheets.
The old completed Signature Sheet may be returned and scanned off by the new Recipient at any time.

4.5.2
Break in Work Transfer Method
4.5.2.1
In
situations where work is not completed by the Work Party in a single shift,
there may be a need to transfer the permit from one Permit Recipient to another
Permit Recipient. This transfer method is processed via the Permit Issuer and
assumes a shift change where the work party ceases work before the
permit is re-issued to a new Permit Recipient and work party.
4.6
Permit Surrender
When work is completed, and/or the permit is to be surrendered, the Permit Recipient and a Permit Issuer are required to be present at the same time, once again enforcing the face-to-face handover.
ePAS will require that all Signature Sheets are returned before the permit can be surrendered. Where other forms are present, these may also need to be returned dependent on the type of activity. This process allows for the validation of the sign-off by all Work Party Members prior to the surrender process being initiated.
Where electronic work party member sign on and sign off is utilized, all work party members must also be signed off via electronic means prior to the surrender of the permit.
The State of Plant must be defined, and the Permit Recipient may also choose to record any Lessons Learned from the job at the point of surrender.
When the Surrender is completed any master control certificates may then also be surrendered, where these certificates are not being used by other permits.
4.7
Scope of Work Change (Modify)
If the scope of work changes once the PTW has been issued, the Permit Recipient shall consult with the Permit Issuer and together consider the impact of the proposed changes on the existing hazards and controls in place and the potential for additional hazards.
If changes to any system controls, such as isolations, are required, then the permit is to be modified to change/extend the identified controls. In some cases, other certificates may also require modification.
The Modify Permit process allows the work to continue on the permit while a new permit revision is planned. ePAS creates a copy of the existing permit. This is designated by a revision number, e.g. 01-PTW-001 rev 1. The changes to the work scope can be planned and the new permit revision approved while work continues under the original revision of the permit.
Prior to issuing the new revision (rev 1) of the modified permit the work stops and the previous revision (rev 0) is surrendered. The new permit revision is then issued, and the work re-commences.
If the scope of work changes are identified prior to the permit being issued, the Amend Permit Request function can be initiated if required or the scope of work changes can also be recorded via the HIRA on the permit when the permit is returned to planning. This process provides the ability to place the permit on hold and make the required changes prior to issuing the permit. The HIRA details can be modified to include new Work Categories, remove existing Work Categories as well as add or remove hazards and controls. The ability to select and link additional control certificates may also be initiated.
ePAS then considers the changed requirements that arise from the amendments to the Permit Request and/or HIRA and will update the permit and associated control certificates appropriately.
5.0
Create a Permit to Work
5.1
This section provides step-by-step instructions to
complete the task of creating a new Permit to Work.
A Permit to Work may only be created directly from an approved Permit Request that defined the permit type to be created as Permit to Work.
The Permit may only be created by a user with the Issuer system role.
The approved Permit Request may be retrieved by various methods such as:
· Select
the Recent Permit Requests shortcut from the default home screen
· Select
the Recent Permit Requests menu item from the Permit Requests menu
· Searching
for the Permit Request number via Quick-search
·
Performing a search using various criteria
(number, state, dates etc.)
To create the PTW
1. Retrieve the required Permit Request:
a. Ensure the Permit Request is in the state of Approved
2. Select the Create Permit button located in the Actions section of the permit bar:
a. ePAS will create the Permit to Work in the state of Planning.
b. Information contained on the Permit Request is copied to the relevant fields on the Permit to Work where required. This information may be edited on the Permit where required by the PTW Issuer.
The process of entering details against a Permit is presented to users in tabbed views, consisting of the following pages of information:
·
General
Details - Includes Work Order details, Outage, Issue Date & Expiry
Date/Time, any Special Requirements
·
Plant
& Work - Details of the plant to be worked on and the scope of the work
·
Tasks/HIRA
- Details the type of work and can be used to undertake the pre-task risk
assessment
·
Recipients
- Identifies the recipient/s of the PTW
·
Isolation
Coverage - Details the Isolation coverage provided by master certificates
·
Cross
Reference - Identifies any items of plant or isolation points in an active
state shared by other permits or certificates
·
Conflicts
- Provides information of any current or potential Hazard Conflicts where
feature is enabled
·
Warnings
and Instructions – Provides the ability to record any job-specific
instructions relative to the permit
·
Documents
- Provides the ability to attach relevant documents, such as the Rescue Plan,
drawings, etc.
·
Relationships
- Establish and/or view relationships between the Permit to Work and other
certificates
·
Forms
- Lists and provides the ability to administer control documents such as
Signature Sheets
·
Approvals
- Details any pending or previous approvals
·
Messages
- Add, read, and modify user messages. Messages added during the Permit Request
planning stages are also available to view for easy reference
·
History
- Records a detailed log of significant changes made to the PTW for the
lifecycle of the permit
5.2.1 General Details
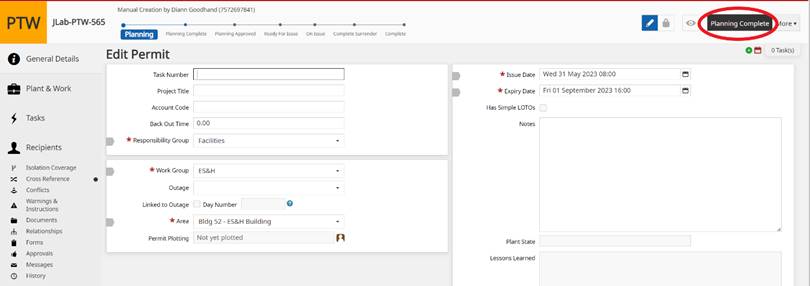
The General Details tab holds information of a general nature such as the location and scheduled dates for performing the works. All of the information displayed upon initial creation of the permit is copied from the Permit Request. This information can be edited as deemed required.
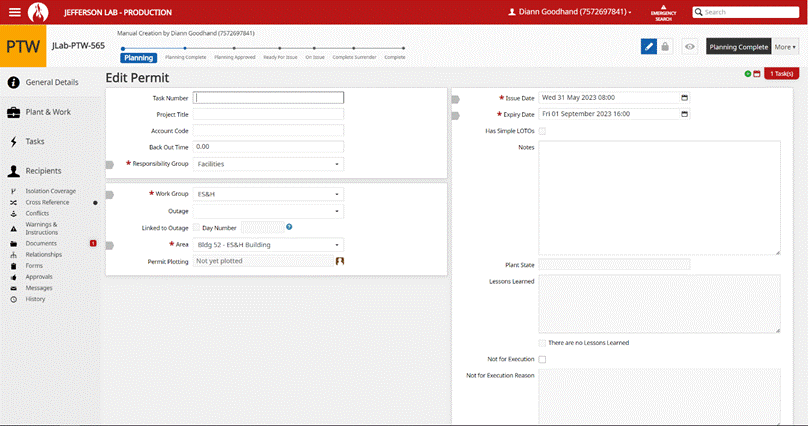
The fields included on the General Details tab are detailed below; complete or edit the fields as required.
|
Field
Name |
Description |
|
Task Number |
This is a free format text field which allows the user to
enter an optional task number, this may also be created from external asset
management system such as ATLis. |
|
Project Title |
This is a free format text field which allows the user to
enter an optional title of the project being completed. |
|
Back Out Time |
This field is used to define how long it takes to restore
the plant if the plant had to be restored unexpectedly. This information may
assist planners in risk evaluation. Enter these details, if required. |
|
*Responsibility Group |
The Responsibility Group chosen should be the group that
has ownership or responsibility over the plant to be worked on. |
|
*Work
Group |
The
Work Group is responsible for the work and are linked to the selected
Responsibility Group. |
|
Outage |
The
Outage field provides a list of active Outages for the defined Responsibility
Group. *This section will not be used* |
|
Linked
to Outage |
The
Linked to Outage field allows you to link the permit to an Outage. Linking
the record to the Outage allows you to: ·
Perform date changes to
all linked records where the scheduled date/s of the Outage change. This is
done via the Edit Outage system maintenance menu ·
View a listing of all
Permit Requests and Permits associated with the nominated Outage in the Edit
Outage system maintenance menu The
permit can only be linked to an Outage if the Outage record has dates
defined. |
|
Day
Number |
The
day cumber field automatically calculates the number of days between the
Outage start date and the defined start date of the Permit when the record
has been linked to the defined outage. |
|
*Area |
The
Area field is a list that displays all Areas related to the defined
Responsibility Group. |
|
Permit
Plotting |
Click
on the |
|
*Issue
Date |
The
Issue Date field is used to identify the date and time that the works are
scheduled to begin. |
|
*Expiry
Date |
Expiry
Date field holds the date and time that the job is expected to be completed. |
|
Notes |
The
Notes is used to enter notes about the permit. This information is added to
the Permit to Work Report. |
|
Plant
State |
The
Plant State field is not editable while the Permit is in the Planning State. |
|
Lessons
Learned |
This
field is a free text field where you can enter the Lessons Learned from this
Permit during later stages of the workflow. When Lessons Learned are
recorded, a new Tab titled Lessons Learned is accessible from under the More
button. This information is generally followed up by senior managers. |
|
There
are No Lessons Learned |
This
is used to indicate there are no Lessons Learned. |
|
Not
for Execution Reason |
This
field is a free format text field, allowing the users to enter a reason for
changing the permit to a Not to be Executed status. |
|
Special
Requirements |
This
is used to detail any special requirements or additional information. This is
also included on the printed Permit report. |
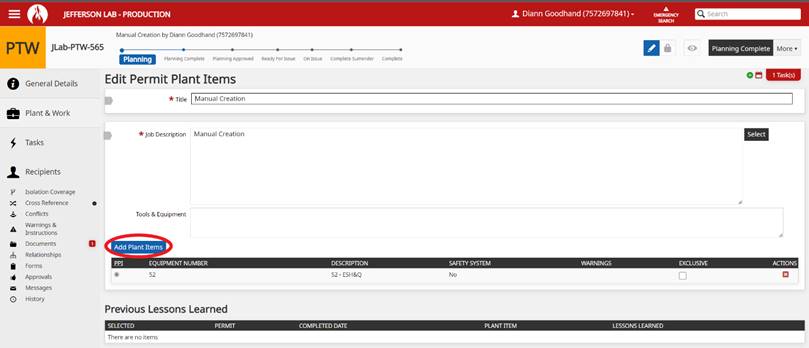
5.2.2 Plant & Work
The Plant & Work tab shows information regarding the Title, Job Description, and Plant Items. All of the information displayed upon initial creation of the permit is copied from the Permit Request. This information can be edited as deemed required.
The plant items added to the Permit Request are automatically transferred to the Permit to Work. Additional plant items can be added, if required, by selecting the blue ADD PLANT ITEMS button.
For a detailed description of how to Add, Edit or Remove a Plant item, please see the Permit Request User Manual Creating, Approving & Using Permits via ePAS (jlab.org)
5.2.3 Tasks
The Task Tab displays details of the pre-planned tasks and associated risk assessments completed on the Permit Request.
If required, the Tasks and associated work categories, hazards and controls may be edited whilst the permit is in the Planning State.
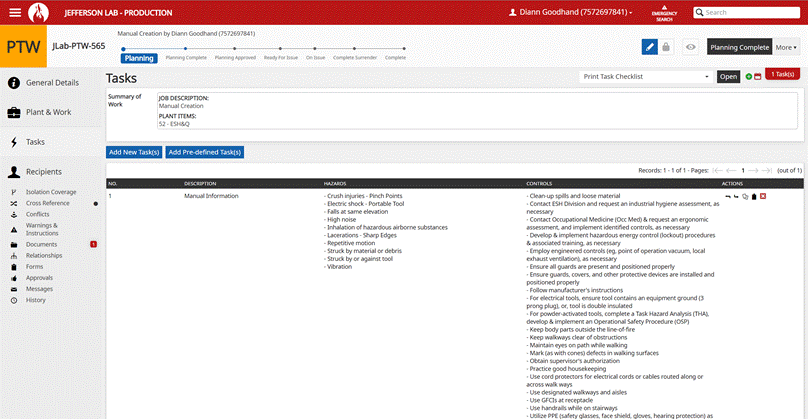
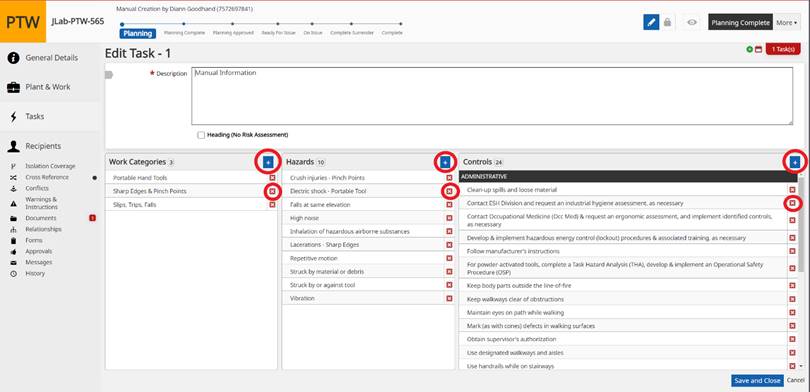
Note: Hazards and Controls may also be edited when the permit is in the states of Ready for Issue, On Issue, and Suspended. This provides the ability to update ePAS where additional hazards or required controls have been identified during on-site inspections or assessments or once work on the permit has commenced.
For a detailed description of how to Add, Edit, or Remove a Task, Work Category, Hazard, or Control, please see the Permit Request User Manual Creating, Approving & Using Permits via ePAS (jlab.org)

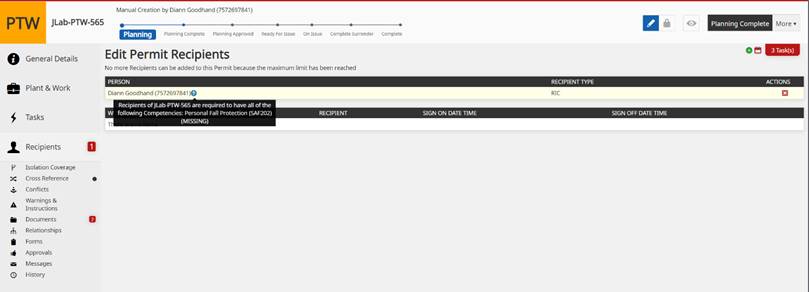
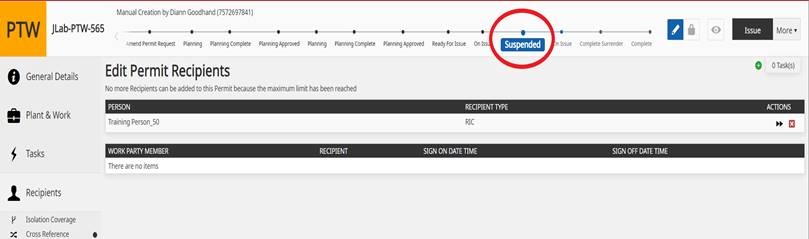
5.2.4 Recipients
The Recipients tab displays the person/s that the permit is planned to be issued to. These details are copied from the Permit Request and can be edited if required. ePAS supports the addition of more than one recipient to the permit. However, during the issue process only one person will be defined as the Recipient in Charge.
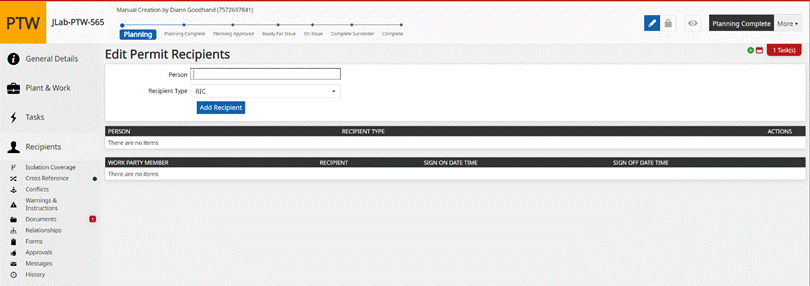
Where, competency requirements are present, ePAS will restrict the issuing of the permit to people that have the required competencies. Where the nominated recipient/s does not have the required competencies to receive the permit, a blue information icon will display the competencies required. You cannot progress the Permit until the nominated recipient is replaced with a person that does not the required competencies.
This may mean that the user record needs to be updated or a new recipient/s with the required competencies can be added.
This warning can be present in two ways. There may be a list of an individual’s listed training or a blue question mark next to the individual’s name. The blue question mark indicates a warning that certain training requirements are missing.

5.2.5 Documents
Documents can be attached to Permits to provide further information about the work scope.
In some cases, Work Categories selected on the HIRA, may require certain documents types to be added (ex: Active Fall Protection).
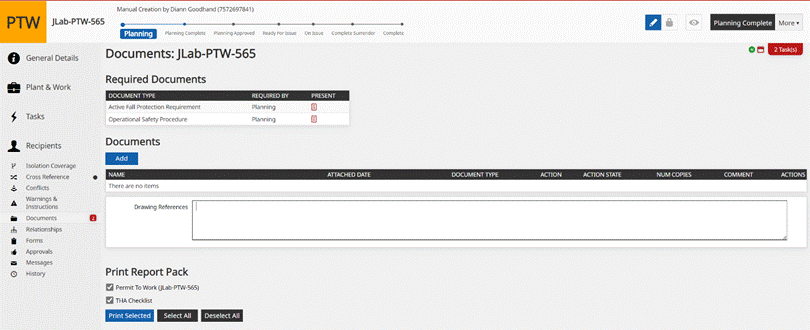
In the example above, ePAS has forced the mandatory attachment of the Active Fall Protection Requirements before the Permit to Work can be moved to the next state. The red icon displayed in the Present Column shows that the mandatory requirement has not yet been met. Once the proper document is attached, the icon in the Present Column will turn green.
The optional drawing reference field provides the ability to insert reference text relating to any drawings associated with the permit.
5.2.5.1 Adding Documents
5.2.5.1.1 To add a document
1. Select the Add button.
2. Select the attachment type from the drop-down menu.
3. Use the Document attachment type to attach files.
4. Use the URL attachment type to attach a link to a website or web-based document management system.
5.2.5.1.2 To delete a document
1. Select the red delete X icon located in the Action column of the Documents data grid.
2. To delete a mandatory document, you must replace it by first adding a new document, then deleting the document that is no longer required.
5.2.5.2 Print Report Pack Section
The Print Report Pack section provides the ability to print any of the listed documents at any time from the Documents Tab. This feature is useful if a review of the documentation is required during the planning stage and also if a reprint of any of the documentation is required after the Permit to Work is issued.
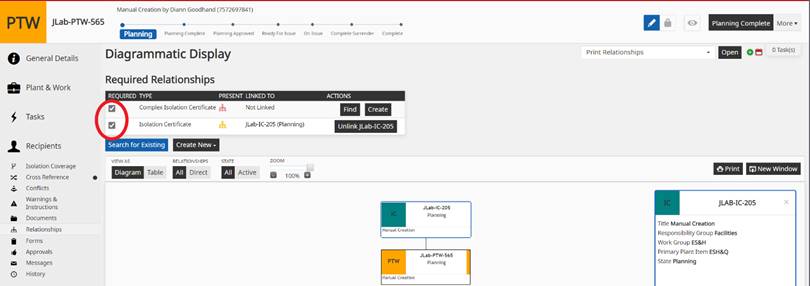
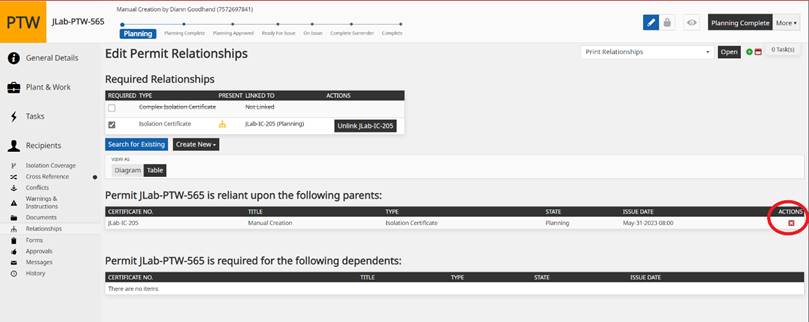
5.2.6 Relationships
5.2.6.1 Required Relationships
The Relationships tab displays information regarding relationships required by the Permit to Work to ensure a safe work environment is established prior to work commencing.
Required Relationships are defined directly from the Work Categories on the HIRA or when you select a required relationship in the Permit Request.
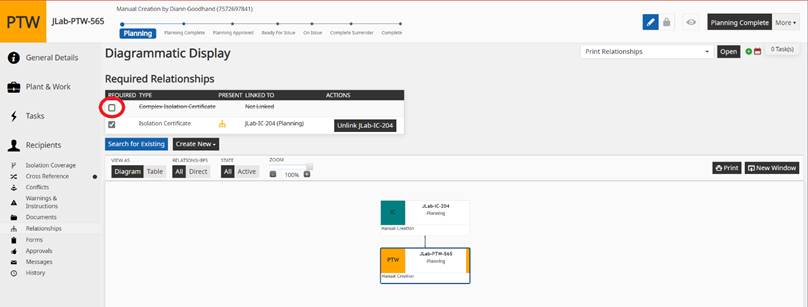
All required relationships are listed in the Required Relationships data grid. You can remove or reinstate a required relationship by selecting the checkbox located in the Required column of the Required Relationship grid.
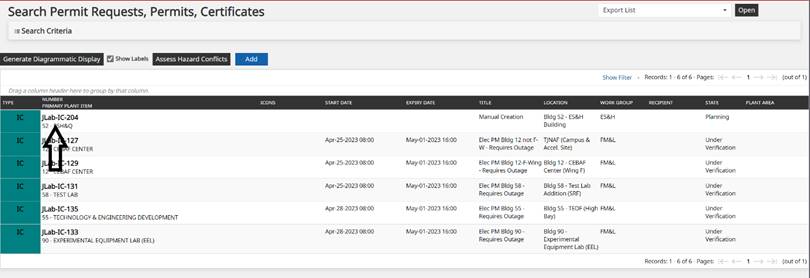
5.2.6.2 To Create a link to a Required Relationship by Searching for an Existing Certificate
1. Select the Find button in the Actions Column
2. Enter the search criteria and select Search
3. Select the relevant certificate and select Attach
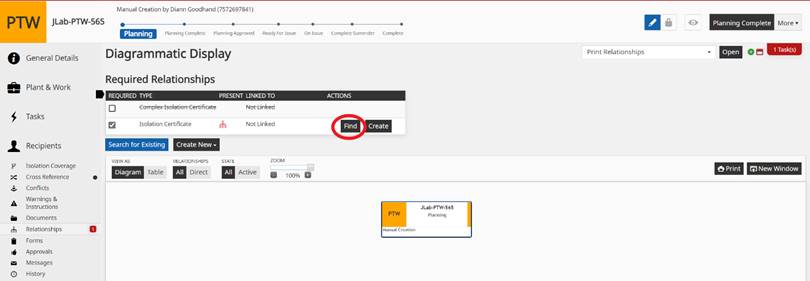

5.2.6.3 To Create a link to a Required Relationship by Creating a New Certificate
1. Select the Create button
2. Review details and update where required
3. Continue through the Process until desired results
4. For step by step process of completing an Isolation Certificate or Complex Isolation Certificate, please see appropriate section in ePAS Manual Work Planning Using ePAS | Jefferson Lab (jlab.org)

5.2.6.4 To Unlink a Relationship
If an incorrect relationship has been created, you can remove this by selecting the Unlink button from the Actions column.

5.2.6.5 Deselect a HIRA driven Required Relationship
When a relationship defined in the HIRA on the Permit Request is no longer required, check the tick box to the left of the Certificate type. This will strikethrough the Certificate type (indicating to users that it was removed).
Note: This process will usually only be done when the system is dictating that both an Isolation Certificate and a Complex Isolation certificate are required. ePAS cannot differentiate when either an
IC or CIC is required to safely complete the task at hand. Because of this, both boxes will be checked. When this occurs, uncheck either the IC or CIC, whichever one is not required, and continue forward.

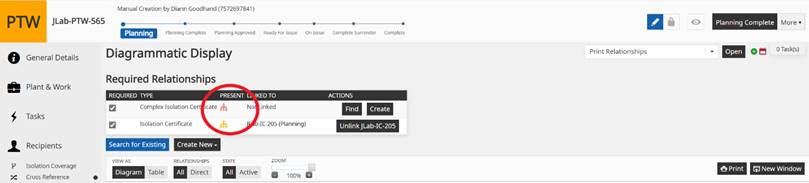
5.2.6.6 Link Status Icon
The icon in the Present Column is shown in different colors to indicate the status of the linked relationship:
· Red - Relationship has not yet been created
· Yellow - Relationship has been created, but the linked certificate is not in the correct state for the Permit to progress
· Green - Relationship has been created and the linked certificate is in the correct state
5.2.6.7 Diagrammatic Display
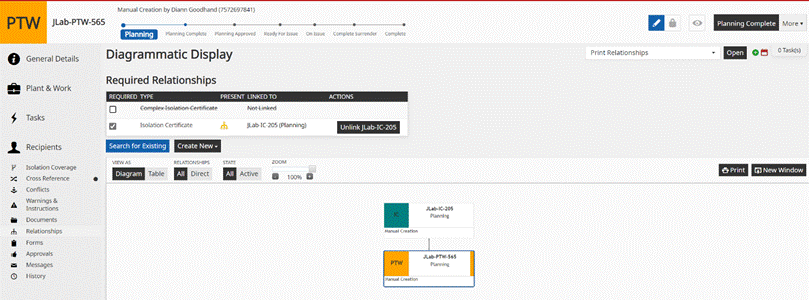
The Diagrammatic Display screen shows:
· The PTW has a linked master Isolation Certificate (there can be other linked certificates such as Confined Space).
· The default display shows All Relationships. The Active State button changes the display to only show objects that are not Complete, Cancelled, or Deleted.
· The Zoom slider allows the user to zoom in and out. This is particularly handy where large relationship plans are in place.
· The New Window button opens the Diagrammatic Display in a separate window.
· The Print button will generate a printed version of the Diagrammatic Display.
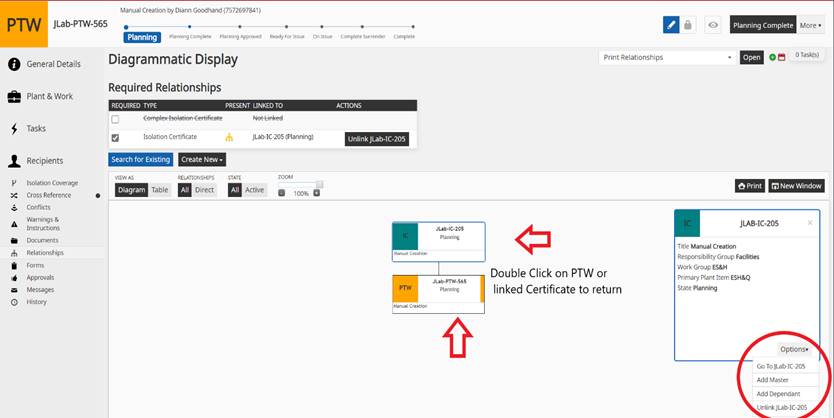
· You can double click on linked Certificates to open the record and view details.
· You can return to the PTW or linked Certificates by either double clicking on the desired Certificate or PTW or by Selecting the Options button to return to PTW or linked Certificates.
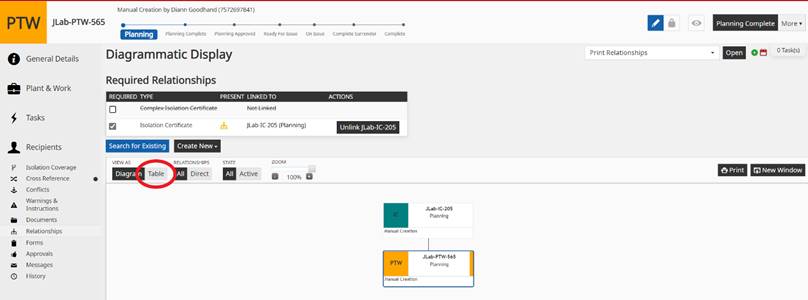
5.2.6.8 Deleting Relationships
To delete a relationship, you must select the Table Display option. This view displays a red cross in the Actions column, allowing you to delete any unrequired relationships.
5.2.7 Forms
The Forms Tab displays forms related to the Permit to Work. The requirement for a form to be generated against the Permit to Work may be based on the Permit type or alternatively, can be driven by the type of work defined within the THA assessment.
The Forms Tab cannot be edited in the planning stages of the permit. Once issued, additional forms may be created as required.
Required forms can be removed in the Planning state if they are no longer deemed necessary by deselecting the checkbox located next to the form.
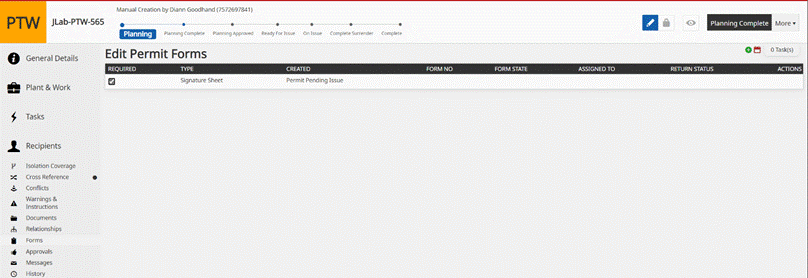
Note: Additional Forms can be added to the Permit while On Issue State by either a Permit Issuer or Permit Recipient. These may be additional Signature Sheets or Permit Audits.
5.2.8 Recording and Viewing Additional Information
The Permit record includes additional Tabs that are not included part of the main permit workflow:
· Approvals Tab – This tab displays details of pending approvals.
· Messages Tab – This tab allows you to add a user message or edit or view existing user messages.
· History Tab – This tab displays detailed history logs for the Permit Request.
· Preview Tab – This allows you to preview the Isolation Certificate report.
6.0
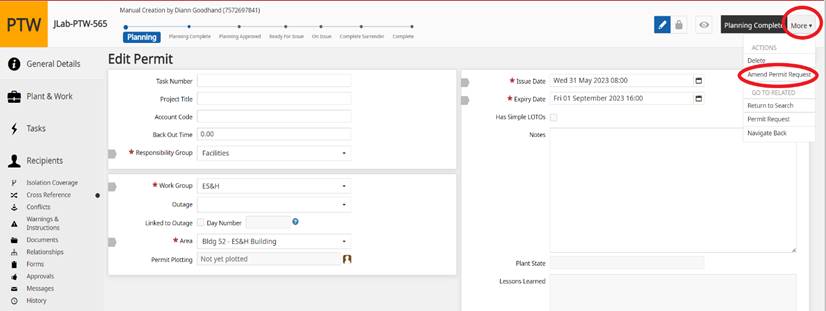
Amend Permit Request
From time to time, change requirements are identified when planning the Permit to Work. In most cases, these changes can be made directly on the Permit without the need to update the Permit Request.
However, where major changes like updating work scope or changing the permit type is required, you may utilize the Amend Permit Request Feature to amend the permit request, obtain approvals for the
changes and then update the Permit to Work. This eliminates
the need to create a new Permit to Work to capture these changes.
Amend Permit Request returns the Permit Request back to Planning to allow the changes to be made. This functionality is only available when a Permit to Work has no revisions or isolations and is in the Planning, Planning Complete, Planning Approved, or Ready for Issue states.
6.1
To Amend the
Permit Request
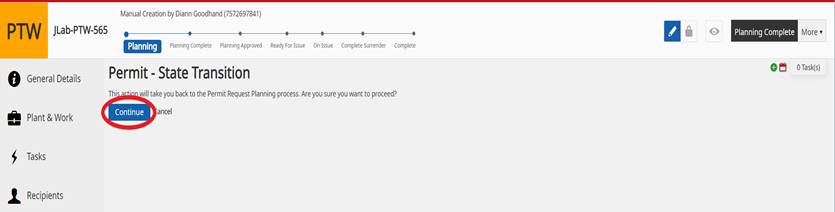
1. Select the Amend Permit Request from under the More button and select Continue.
2. The Permit Request returns to Planning to allow changes to be made.
3. Once the changes are made, you must resubmit and approve the amended Permit Request.
4. Once approved, select the Update Permit button under the Actions section.
5. The Permit is updated with the modified details.
7.0
Planning Complete
The permit planning process is now finalized and the Permit to Work is now ready to progress Planning Complete. This signifies that a Permit is ready to be approved, and the system performs checks to ensure that all the information has been entered.
To complete Planning, select the Planning Complete under Actions. The Permit to Work is then updated to the state of Planning Complete and is ready to be reviewed and approved.
7.1
Approvals
The Permit to Work is now ready for review and approval by the Permit Issuer. Once it has been assessed as complete and correct, it must be approved to proceed to the Ready for Issue state.
Depending on the type of work being carried out, there may also be additional approvals required from specialists’ approvers. Examples of these types of approvals are:
· Hot Work Authorizer – where the work will involve hot works type activities and hazards.
· Radiation Safety Officer – where work involves working with or around radiation areas or equipment.
· Active Fall Protection – ES&H SME approval requirement.
Generally, the Specialist approvals are processed prior to the final Permit Issuer approval, so that the Permit Issuer has full visibility of all aspects of the Permit to Work.
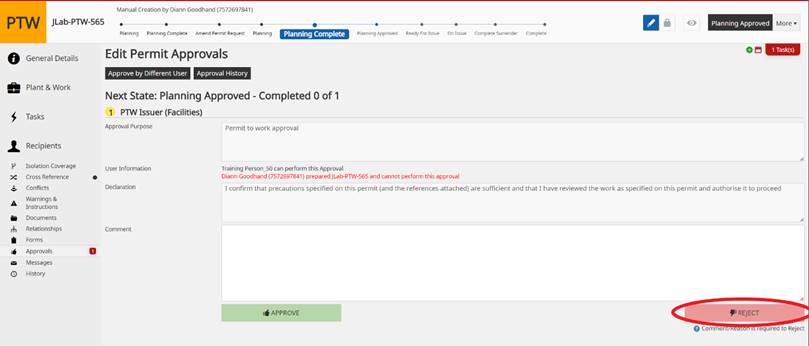
The Permit Issuer will assess the Permit. If all information is correct, the Permit to Work can be approved.
If the logged in user does not have the required System Role to Approve, the Approve action button will be greyed out. Hovering over the Approve action button displays information as to why they cannot perform the approval.

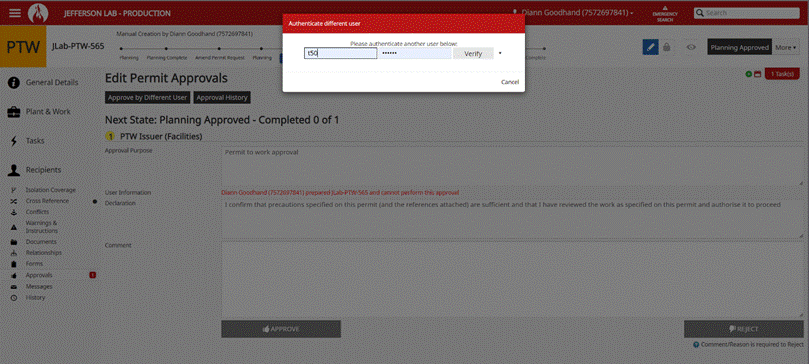
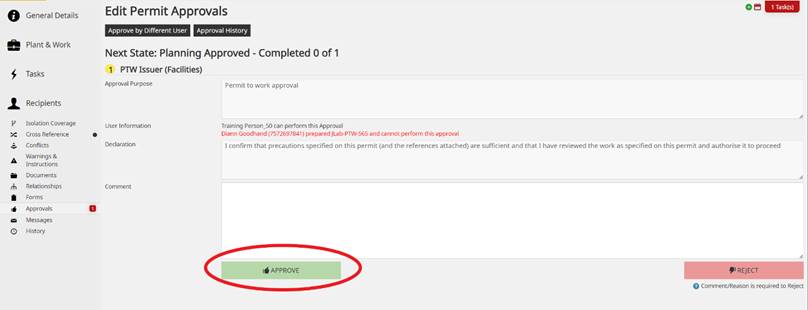
To approve, click the green Approve button to process the approval. Once all approvals are processed the permit to Work will move to the Planning Approved state. The Planning Approved state indicates that all the required planning and preparation tasks have been completed. Once the permit is ready to be issued (collected) by the Recipient, the permit state is set to Ready for Issue.
Note: Unlike the Permit Request, the Permit Request Creator cannot approve their own Permit to Work. For a Permit to Work to be approved and put in the On Issue state, this requires a secondary approver with the proper system roles and training competencies. The Approve by Different User button will allow the approver to enter their login information for approval.
7.2
Reject
Approval
Rejecting may be required when the information on the PTW is incomplete, erroneous, or raises any issues to be investigated before approval is granted.
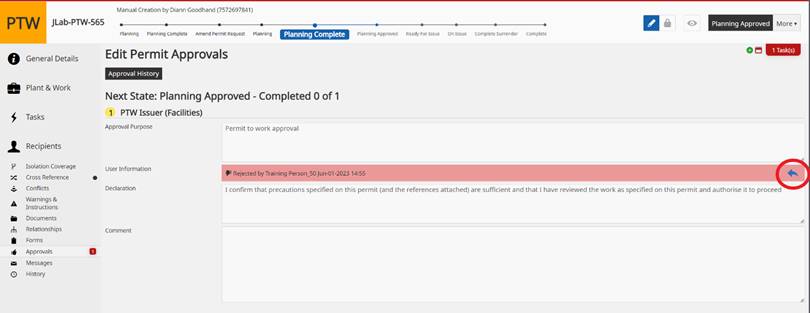
To reject an approval, enter the reason for rejection and select the Reject button. From here, the PTW can be reset back to Planning to address the issues.
Email notifications may be generated and sent to the appropriate role(s) when a PTW is rejected.
To reset the approval, select the blue arrow button to the right-hand side of the red box.
7.3
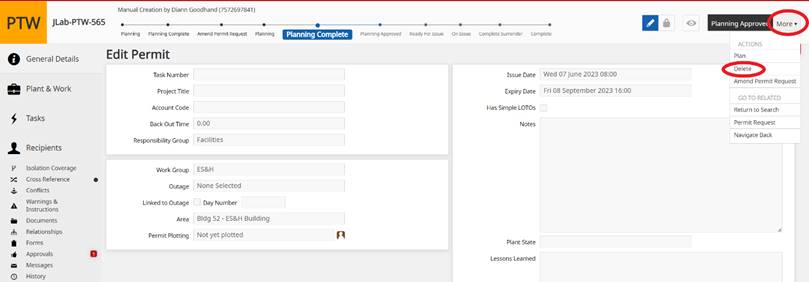
Delete a
Permit to Work
A Permit to Work can be deleted if no longer required. To delete a Permit to Work, select the More button in the upper right-hand corner and select the Delete option. Acknowledge the confirmation message, enter any relevant notes and select continue.
Deleted permits
are not displayed under the Recent Permits and Certificates menu. They can
however be searched for from the Search screen.
7.4
Conflict
Warning
ePAS will display a warning message when issuing a Permit to Work where Conflicts exist on the permit itself or with other permits or certificates.
A thorough investigation should be carried out to determine whether work is safe to proceed. Where identified, alternative actions may need to be implemented, such as delaying the issuing of the permit until safe to do so.
In instances where the work is deemed safe to continue as planned, the Permit Issuer must acknowledge that they understand the conflicts and agree to proceed during the issuing process. The acknowledgement that work may proceed is fully audited and recorded on the History tab.
8.0
Issuing a Permit to Work
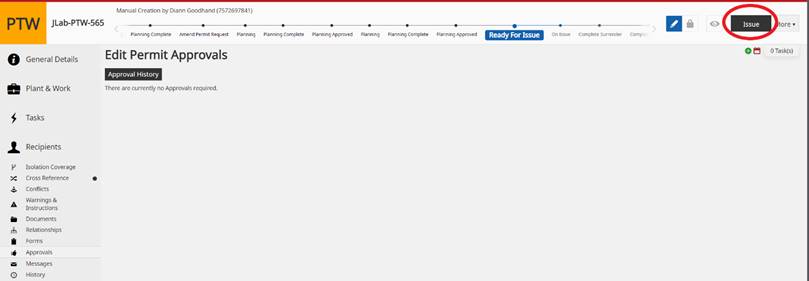
Once a permit has been approved and all control certificates have also been issued, the permit can progress to the Ready for Issue state.
The Recipient in Charge (RIC) is the person responsible for the Permit to Work and related documents including the Permit to Work, Signature Sheet(s) and any documents attached to the permit.
8.1
Issue the Permit to Work
To issue the Permit to Work
1. Select the Ready for Issue button.
2. Select the Issue button.
o You can see the progress timeline on the top of the page that will move forward to the On Issue state.
3. The Recipient Actions window is displayed to validate the RIC credentials.
4. The recipient must authenticate their credentials in the system with your systems preferred method of identification (i.e. username and password that was provided after completion of training).
5. If there are multiple recipients, all of them must authenticate.
6. The Recipient Actions tag will display with the requirement of the electronic signature sheet. Press OK to continue forward with putting the Permit to Work On Issue.
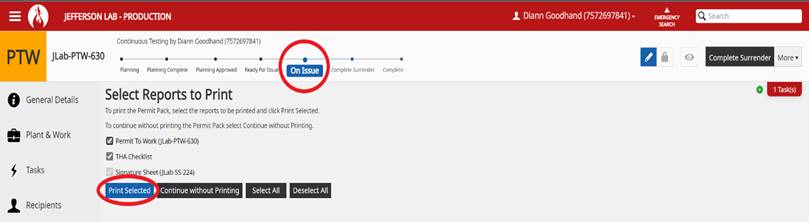
7. The Reports that are selected will be the reports required for the Work Package. It is important to print these items to have the Permit to Work, THA, and any other documents on the job being performed.
8. The permit to work has now been updated to the state of On Issue.


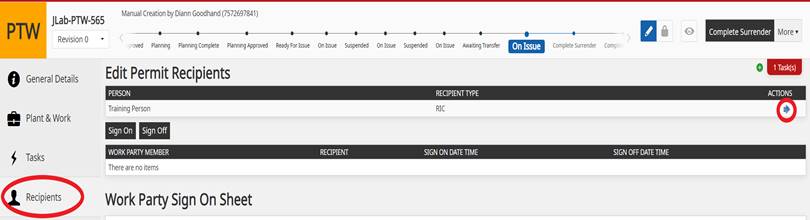
NOTE: The state of On Issue is when work can commence on the plant under the authority of this permit. It is important to remember to add Work Party Members on to the Permit to Work before starting work. This is the electronic signature sheet showing what individuals are performing work on the Permit to Work alongside of the Recipient in Charge. Work Party Members can be “Signed On” and “Signed Off” of the Permit to Work by the Recipient in Charge.
8.2 Work Party Member “Sign On”
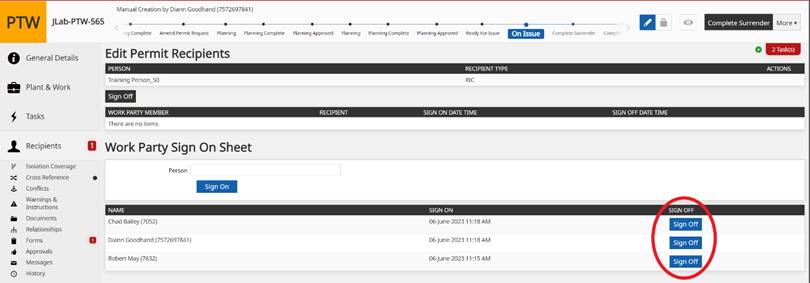
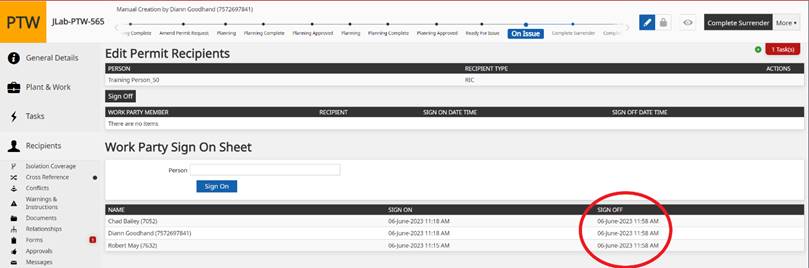
A Work Party Member is an individual who is assisting the work being completed, however, is not defined as the Recipient in Charge. The “Sign On’ and “Sign Off” of a Work Party Member is documented on the electronic Signature Sheet in the ePAS system. It is important to “Sign On” and “Sign Off” any other worker who is assisting with the operations under the assigned Permit to Work. A Permit to Work cannot be surrendered if there are still Work Party Members “Signed On”.
Steps to “Signing On” Work Party Member
1. Once the Permit to Work is in the On Issue state, select the Recipients tab on the left hand side of the ePAS system.
2. In the Recipients tab, you will see the section for Work Party Sign On Sheet.
3. In the person section on this page, insert an individual who will be assisting with the task at hand and click the blue Sign On button.
4. Once the Work Party Member is added onto the Permit to Work, you will see the “Sign On” date and time recorded in the ePAS system.
5. Additional Work Party Members can be signed on in the same manner.


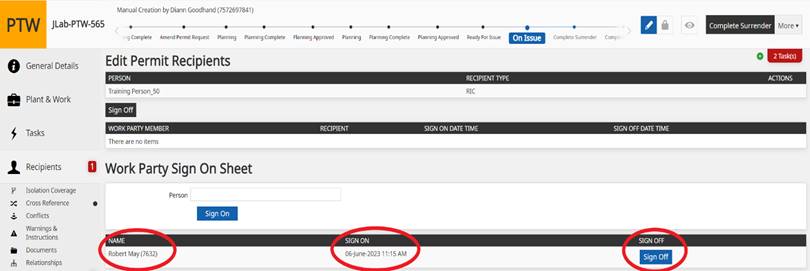
NOTE: Before surrendering a Permit to Work, all Work Party Members must be electronically “Signed Off”.
Once the Permit to Work and all other Certificates are in the On Issue state, all Work Party Members have been “Signed On”, and proper work package printed out, approved work can commence.
9.0
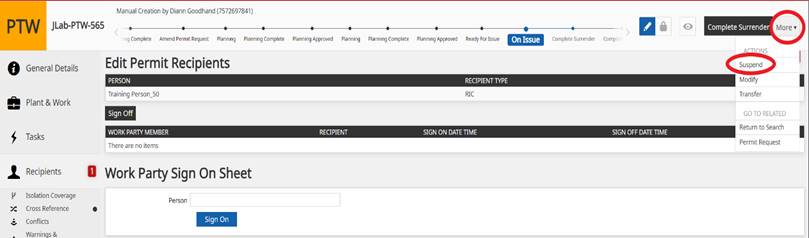
Suspend a Permit to Work
There are a number of reasons for suspending a Permit. Some of these reasons include, but are not limited to:
1. End of shift – the Permit is suspended with the intention that it will be re-issued again the following morning, or next shift.
2. Work cannot continue, for example, waiting for parts.
3. Need to temporarily energize the plant item for testing.
4. Changes are required to the Permit or one of the Certificates the Permit relies on.
NOTE: A Permit to Work can only be suspended from the state of On Issue. Suspending a Permit to Work puts the Permit on hold (in the Suspended State). Before this can be done, all work must stop. No work can take place under the authority of the Permit while it is suspended.
9.1 To Suspend a Permit to Work
1. Select the More button, located in the upper right-hand corner.
2. From the drop-down list, select the Suspend button.
3. Select the OK button on the acknowledgement window.
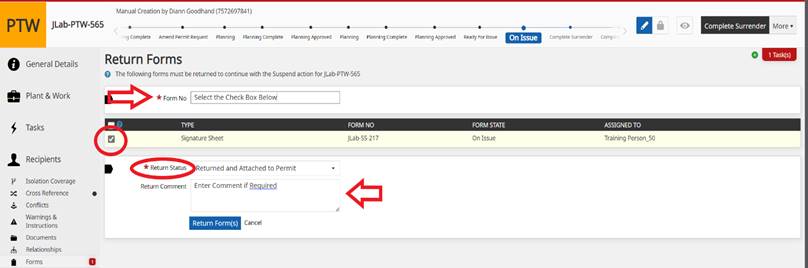
4. Return any forms that must be returned during this state.
5. The forms that must be returned are displayed in the forms data grid. To return forms:
a. Select or scan the Forms and Select the Return Status
b. Enter a Comment if required
c. Select Return Form
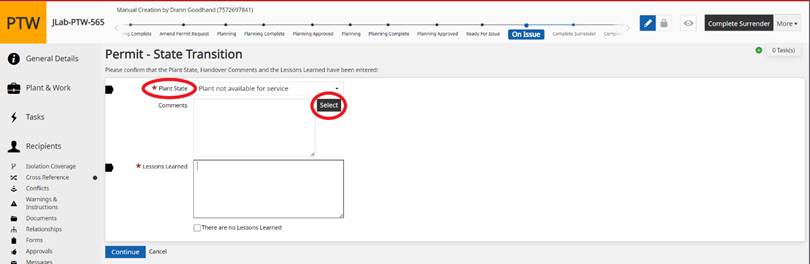
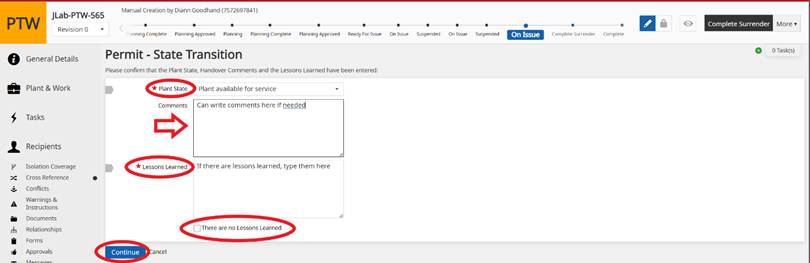
6. The user is navigated to the Permit State Transition Screen. The following fields are displayed:
a. Plant State - Select the relevant option from the dropdown list.
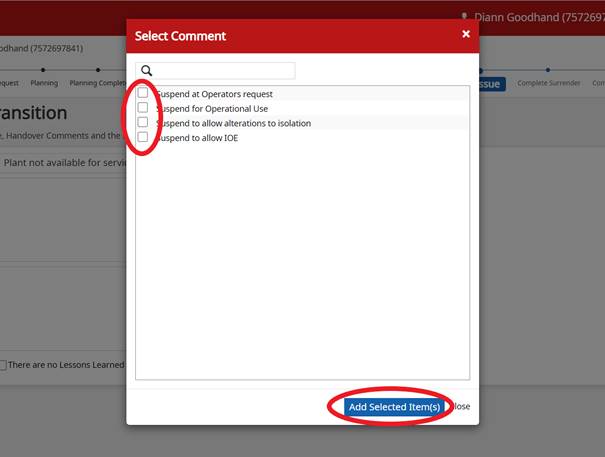
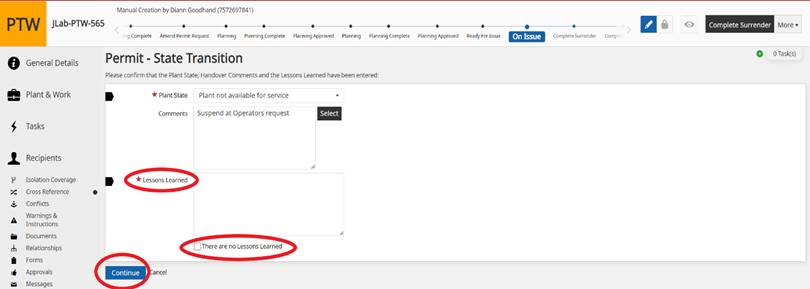
b. Comments - Enter any comments relevant to the suspension.
c. Lessons Learned - may be added if applicable. If there are no Lessons Learned, select the No Lessons Learned Checkbox.
d. Select the Continue button to proceed with the Suspension.
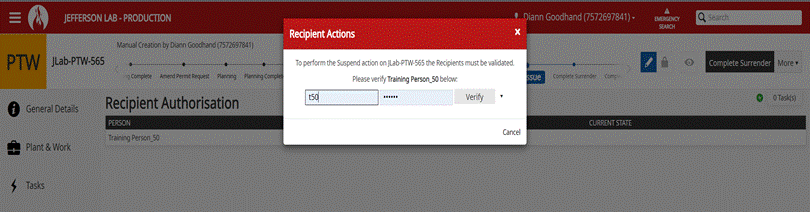
7. The Recipient in Charge must authenticate in order to perform the Suspend action, or another person may sign off by proxy if authorized to do so or if the Recipient in Charge is no longer present. The Permit then enters the Suspended state.
8. The Permit to Work may then be reissued, returned to planning or continued to the surrender process.
a. To Reissue, continue with the normal issue process stated above.
b. To Return to Planning
i. Select the More button, in the upper right-hand corner, and select Plan to bring the Permit to Work back to the planning state.
c. To Surrender the Permit to Work
i. Select the More button, in the upper right-hand corner, and select Surrender. Follow the process listed below to Surrender a Permit to Work.
10.0
Modifying a Permit to Work
Modifying a Permit to Work can be required when the nature, timing or conditions of the work have changed (i.e. the work scope). The Modify process allows work under the current revision to continue while a new revision of the permit is being planned and approved.
When the Modify action is selected, a new revision of the permit is created in the state of Planning. This revision is modified as necessary, and then progressed through Planning Complete and Planning Approved into Ready For Issue in order for the revision to take the place of the original Permit.
The original revision must be surrendered first before the revision, now in the state of Ready For Issue, can take its place. All information from the original revision is copied to the new revision when created.
10.1 To Modify a Permit to Work
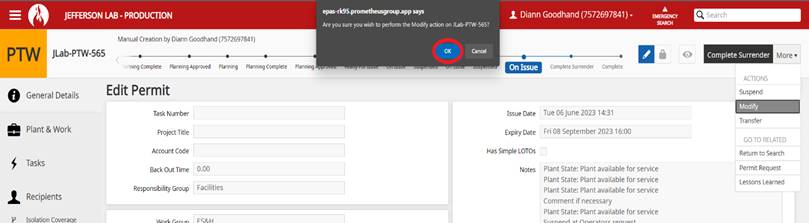
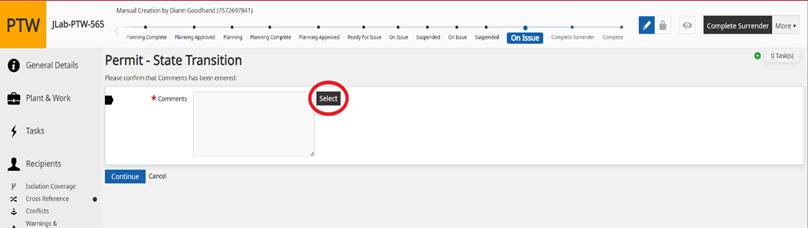
1. In the Permit to Work that requires modification, select the More button in the upper right-hand corner. Then select the Modify button in the drop-down menu.
2. Enter the reason for modification in the Comments field presented on the Permit State Transition screen.
3. A new revision is created.
4. The original revision of the Permit to Work remains on issue.
5. Make the necessary changes to the new revision and progress it through to the Ready For Issue state, as shown on the timeline at the top of the page.
6. Select the original Permit to Work and initiate the Surrender action. This step-by-step process is referenced below in the Surrender Permit to Work section.
7. Return the control documents associated with this version of the permit.
8. At the Permit - State Transition screen, select the Plant State, enter any Lessons Learned if required and click Continue.
9. The surrender action must be validated by the permit recipient. Authenticate the recipient to verify the surrender of the original Permit to Work.
10. The last step will then be to put the new revision of the Permit to Work to the On Issue state. Make sure to bring the new work package to the job site for reference of the changes to the scope of work.


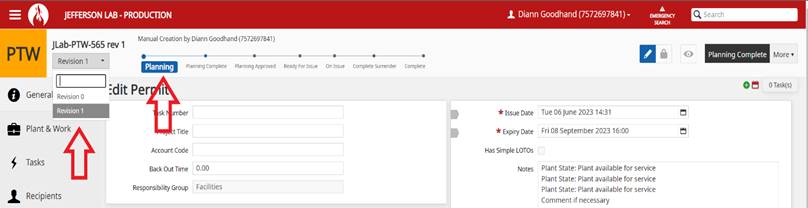
NOTE: As shown above, the new revision of Permit to Work (JLab-PTW-565) is now shown as JLab-PTW-565 rev 1, in the drop-down menu. Both of the Permit to Works can be selected from this drop-down menu to move back and forth between the two.
At this point, revisions to the work scope would be made and all adjustments would be edited. The new revision would go back through the approval process, that was noted above in Approving a Permit to Work, all the way to the Ready for Issue state.
Once the new revision is in the Ready for Issue State, you can properly surrender the original Permit to Work through the surrender process outlined in the Surrender a Permit to Work section below. After the surrendering of the original Permit to Work, the new revision can be moved to the On Issue state and the new work package can be brought to the work site for reference.
11.0
Transferring the Permit to Work
Permits may need to be transferred from one Recipient to another for various reasons, including:
· At the end of every shift if the works are continuous
· The nominated recipient(s) are no longer associated with the work
A Permit to Work can only be transferred when the Permit is in the On Issue state. There are two different methods for transferring a Permit to Work:
· Break in Work Transfer
· No Break in Work Transfer
11.1
Break in Work
Transfer Method
In situations where work is not completed by the Work Party in a single shift, there may be a need to transfer the permit from one RIC to another RIC. This transfer method is by the current RIC.
This transfer method is processed via the Permit Issuer and assumes a shift change where the work party ceases work before the permit is re-issued to a new Permit Recipient and work party.
To perform the Break in Work Transfer method:
1. Select the More button in the upper right-hand corner.
2. Select the Transfer option from the drop-down menu.
3. Select the Plant State, comments and Lessons Learned.
4. Click Continue. The system will display the Recipient Authorization screen.
5. The Recipient must authenticate, or another person may sign off by proxy if authorized to do so. The Permit then enters the Awaiting Transfer state.
6. The original RIC needs to be removed from the Recipients Tab and replaced with the new RIC.
7. The Permit to Work may then be reissued to a new permit Recipient, Surrendered or returned to Planning.

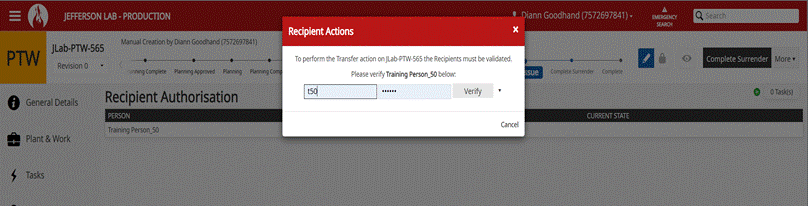
NOTE: Must validate the original RIC with username and login credentials provided in training.
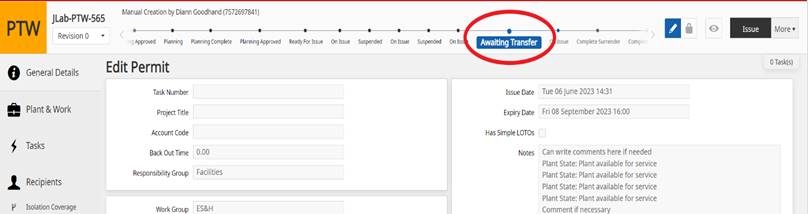
NOTE: Permit to Work is now in the Awaiting Transfer state for the transfer to the new RIC.

NOTE: Under the Recipients Tab remove the original RIC and replace with new RIC. The new RIC’s training will be verified in the system. Once this is completed, the Permit to Work can go through the issue process, as shown in the Issuing a Permit to Work section, and move to the On Issue state to resume work.
11.2 No Break in Work Transfer Method
In situations where work is being performed there may be the need to transfer the permit from one Permit Recipient to another Permit Recipient, i.e. Recipient shift change but some work party.
This transfer occurs directly between Recipients and the permit remains on issue during this changeover. The new Recipient inherits the existing signature sheets and any other forms i.e. Hot Work, Confined Space, etc.
However, it is good practice for the new Recipient to print new Signature Sheets and use this with their briefing with the existing work party, i.e. sign off the old signature sheets and on to the new signature sheet with the new Recipient’s name shown on the new sheets.
To perform the No Break in Transfer Method:
1. The existing recipient must be logged in and located on the Recipients Tab.
2. Select the blue transfer icon located in the Actions column of the Recipient data grid.
3. The Transfer Recipient window is displayed, verifying that the permit is being transferred from the current recipient and asking to authenticate the transfer to a new person.
4. Authenticate the new recipient.
5. The Transfer Recipient window details the Transfer to and from recipient details.
6. Select Continue to finalize the transfer process.
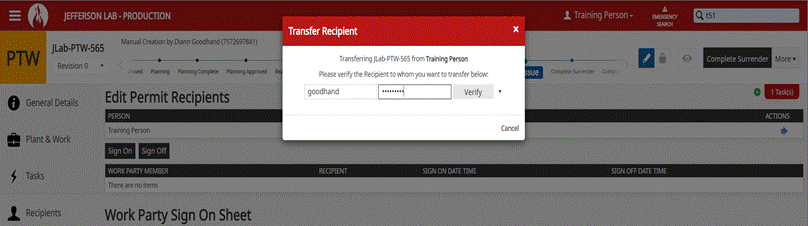
NOTE: This is where the new RIC would enter their username and password credentials, provided in the training, and select the Verify button to verify the transfer.

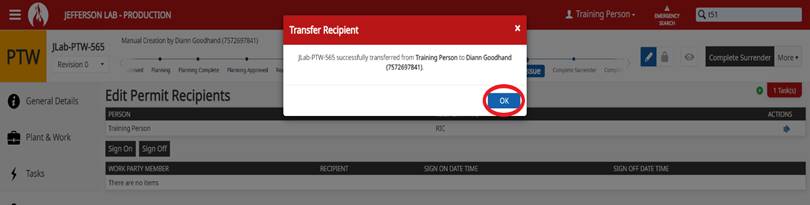
Note: When the transfer is completed, you will receive a verification message. To move forward, press the OK button. This will take you back to the Permit to Work that remains in the On Issue state.
Any current forms associated with the Permit to Work are transferred to the new recipient. The Permit Pack documents are not reprinted, and any current forms associated with the Permit to Work are transferred to the new recipient.
12.0
Surrendering the Permit to Work
When work is completed, and the permit is to be surrendered, the Permit Recipient and Permit Issuer are required to authenticate to surrender the permit, enforcing face-to-face handover.
To surrender the permit, a Permit Issuer must be logged into ePAS.
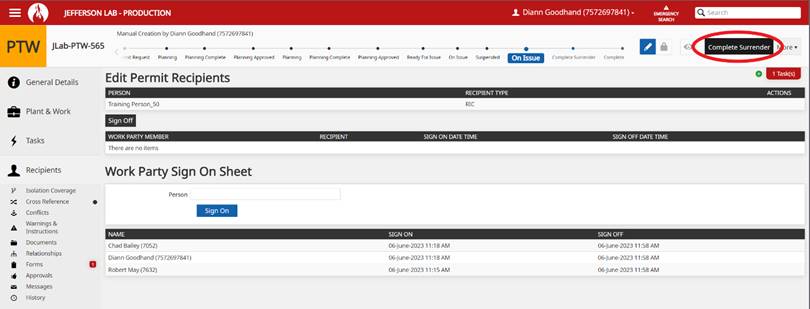
1. Once the Permit Issuer is logged into ePAS, return to the Recipients Tab and sign off all Work Party Members on the Permit to Work. The Work Party Members must be signed off before ePAS will allow you to correctly surrender the Permit to Work.
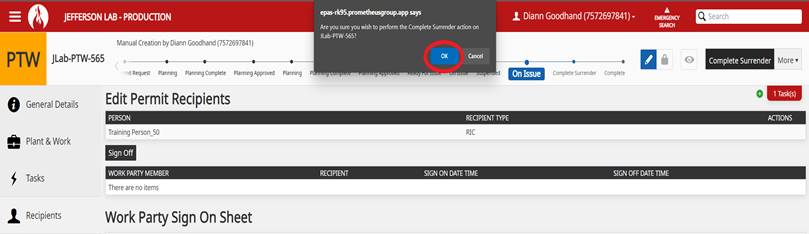
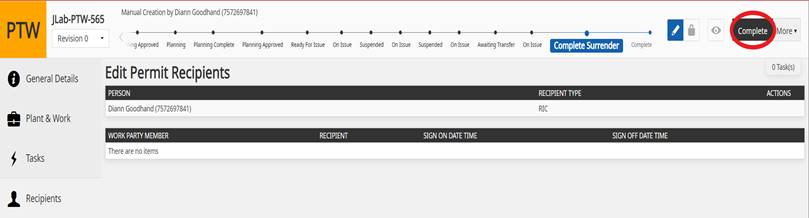
2. When all Work Party Members are signed off, select the Complete Surrender button in the upper right-hand corner.
3. This will prompt a verification page to verify that work is completed. Select the OK button to move forward.
4. The Return Forms screen is displayed to prompt the return of the Signature Sheet. Select the check box next to the Signature Sheet Form Number. This will automatically populate the correct Signature Sheet that needs to be surrendered.
5. Select the appropriate Return Status of the signature sheet from the drop-down menu.
6. Click on the Return Form(s) button to move forward.
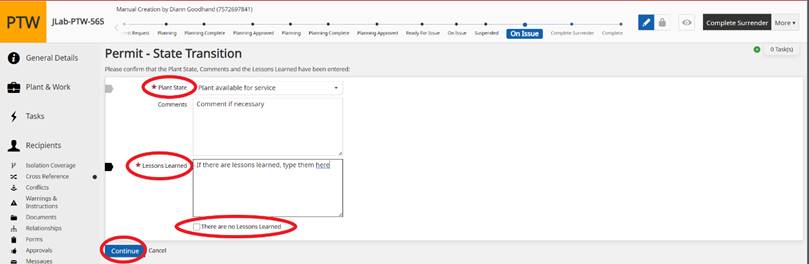
7. The State Transition screen is displayed where the Plant State, Comments, and Lessons Learned can be entered. Select the appropriate description of the Plant State from the drop-down menu.
8. Enter a Comment if necessary.
9. Enter Lessons Learned or check the There Are No Lessons Learned checkbox underneath.
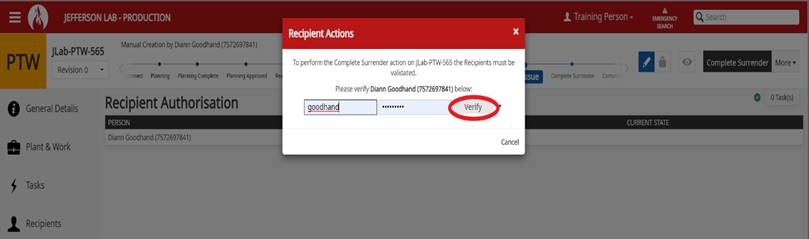
10. ePAS will display the Recipient Authorization page. Enter the appropriate credentials for the RIC to verify that work has been completed and press the Verify button.
11. Once the RIC authenticates the return of the Permit to Work, the permit then enters the complete state.
12. Press the Complete button in the upper right-hand corner to complete the process. ePAS will verify, for the final time, that you are sure the work is properly completed. Acknowledge the prompt by pressing OK.
13. ePAS will verify, for the final time, that there are no Lessons Learned. Select the Continue button to verify there is no other additional information required.
14. The user will then be navigated to the Relationship Surrender screen to assess what action, if any, is required to be taken in regard to any related certificates, i.e. Isolation Certificate. Once the Permit to Work is properly surrendered, there will be a No Action in the upper right-hand corner where the buttons existed.


13.0
Remote Approval Process of a Permit to Work
ePAS allows the feature for remote approval of a Permit to Work. There is not always the ability to have the person-to-person interface on one terminal to approve work that needs to be completed.
The remote approval will function in the Ready for Issue state for the Recipient in Charge. This will allow the Recipient in Charge to remotely approve the Permit to Work so that the permit can be moved to the On Issue state and work can be completed.
The steps below are how to initiate the Remote Work capability in ePAS.
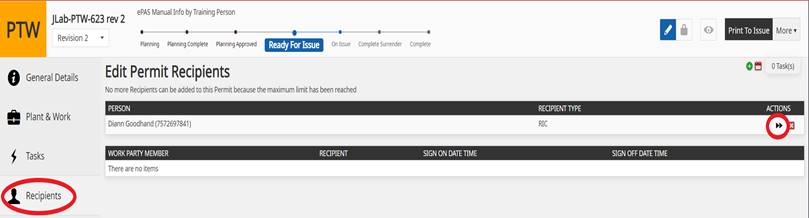
1. When the Permit to Work is in the Ready for Issue State, select the Recipients Tab on the left-hand selection area.
2. In the Actions section of the Recipient in Charge, there will be a ►► button. This button will initiate the remote approval capability in ePAS. Select the ►► button.
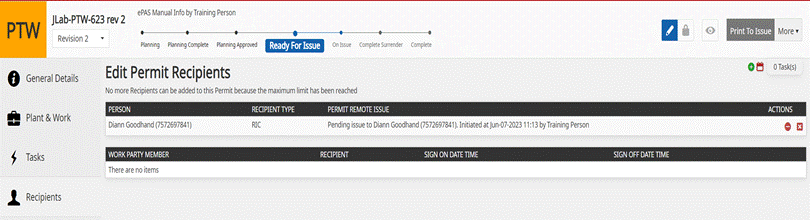
3. Under the Recipient in Charge, you will now see an area that says Permit Remote Issue with the Pending Issue to the RIC.
4. The RIC can now locate the Permit to Work on their computer terminal and go to the Recipients Tab.
5. Under the Recipients Tab there will be a green √ in the Actions section. The RIC needs to verify the use of Permit Remote Issue by clicking on the √.
6. The RIC will then be prompted to authenticate using their username and login credentials. Select Verify to continue forward.
7. The number of signature sheets will be asked for. Select OK to continue forward.
8. The reports will then be generated and the Permit to Work progresses to the On Issue state. Once in the On Issue state, the reports can be printed out and work can commence.


Note: It is important to pay attention to who is logged in. When a new user needs to access the Permit to Work for approval purpose, the original user needs to make sure they have exited out of the Permit to Work. ePAS will lock the Permit to Work so that access cannot be granted as a safety measure.
14.0
Revision History
|
summary |
date |
|
|
0 |
new ePAS Manual section |
06.07.2023 |
![]()
![]()
![]()
![]()